Remote Monitoring of the JVM
2021-11-13
Getting a close look into a running system can sometimes be pivotal for resolving an issue. There exists a class of problems only occurring on your production system. Logs and metrics go a long way surfacing those, but sometimes you have to go deeper.
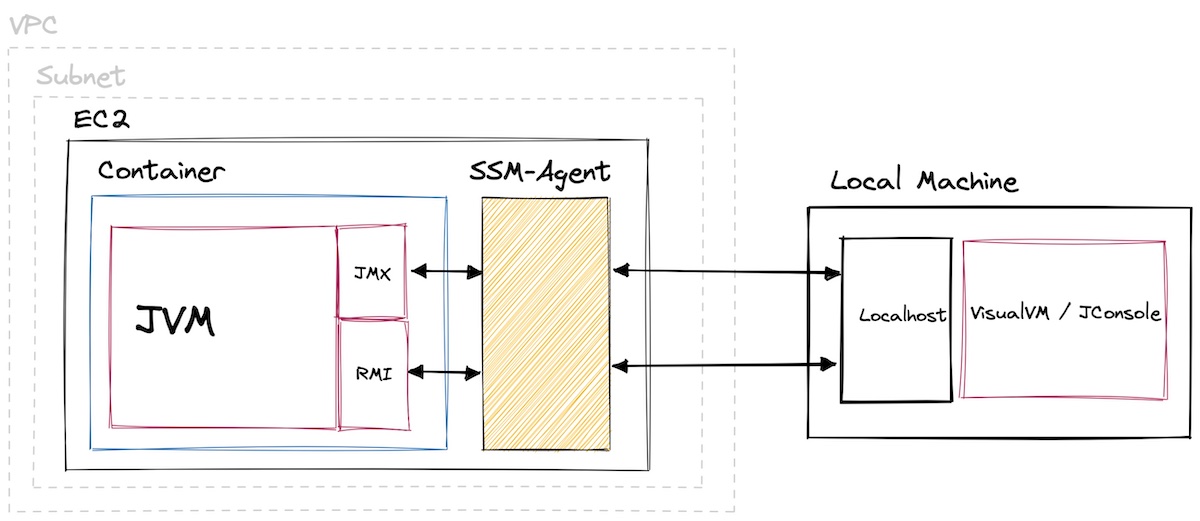
In this post you will learn how to use VisualVM to check a JVM app running on a remote host. The app is running on an AWS EC2 instance within a private subnet. It's also packaged in a docker container. But with host networking enabled, that doesn't require any special attention.
1. Enable Remote JMX
VisualVM allows monitoring remote hosts using either jstatd or JMX. We are going to use the latter, it's supposed to be more powerful. But JMX also comes with a downside. You need to start your application with the following parameters:
-Dcom.sun.management.jmxremote
-Dcom.sun.management.jmxremote.port=9010
-Dcom.sun.management.jmxremote.rmi.port=9011
-Djava.rmi.server.hostname=localhost
-Dcom.sun.management.jmxremote.authenticate=false
-Dcom.sun.management.jmxremote.ssl=false
JMX now listens on port 9010, RMI (remote method invocation) on port 9011. RMI is a JVM specific remote procedure call implementation. It's the mechanism or protocol to access remote JMX hosts.
You can check using netstat:
$  netstat -l
Active Internet connections (only servers)
Proto Recv-Q Send-Q Local Address           Foreign Address         State
…
tcp6       0      0 [::]:9010               [::]:*                  LISTEN
tcp6       0      0 [::]:9011               [::]:*                  LISTEN
2. Forwarding Ports
As you gleamed from the parameters above, we bound the ports to localhost. You are going to use port forwarding to make those ports accessible from your machine. This way you don't have to bind to a public interface and can disable authentication and SSL. If you have SSH access to your host, you can use a SSH tunnel to forward the ports. From your machine:
$ ssh
  -L 9010:localhost:9010
  -L 9011:localhost:9011 USER@HOST
The command opens port 901x on your machine and forwards everything to port 901x on the host. Be sure to tunnel both the JMX and RMI port.
You must map the remote RMI port to the same local port. The JMX connector is unaware of the tunnel and will always direct you to the remote RMI port. You can map the JMX port to a different local port though.
If you don't want to manage SSH, AWS has you covered. Their SSH-as-a-Service "SSM" product supports both interactive shells and port forwarding on EC2. Using the AWS CLI:
$ aws ssm start-session
  --target INSTANCE_ID
  --document-name AWS-StartPortForwardingSession
  --parameters '{"portNumber": ["9010"], "localPortNumber": ["9010"]}'
$ aws ssm start-session
  --target INSTANCE_ID
  --document-name AWS-StartPortForwardingSession
  --parameters '{"portNumber": ["9011"], "localPortNumber": ["9011"]}'
You can't do it with a single command, SSM only allows a single pair of ports. You can check your connection using netcat:
$ nc -v localhost 9010
Connection to localhost port 9010 [tcp/commplex-main] succeeded!
VisualVM Connection
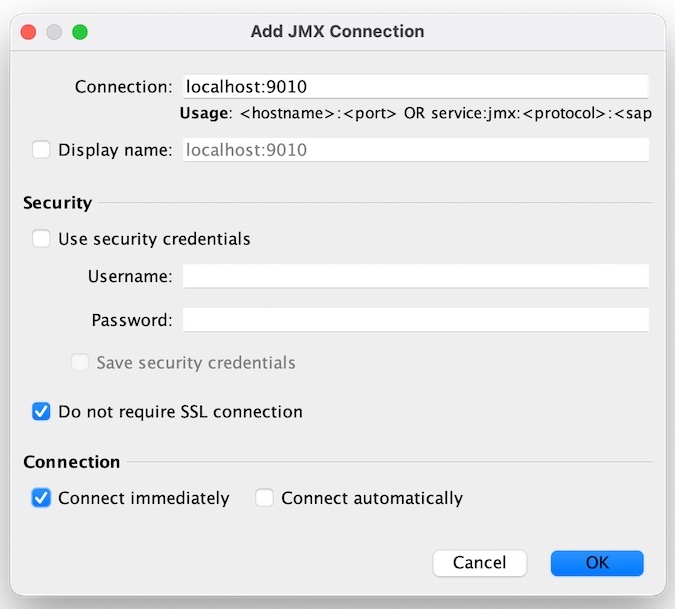
Within VisualVM add a new JMX connection. It's the fourth button in the toolbar, I'm using v2.1.1. A dialog will open, for the "Connection" enter "localhost:9010". Do not check "Use security credential". Do check "Do not require SSL connection". Hit OK. You might need to restart VisualVM at this point. But then you should be good to go.
Happy profiling.